DS-160
This is the Nonimmigrant Visa Application Form. Essentially an application form to obtain your student visa.
DS-2019
This is the equivalent to the I-20 but for the J-1 Visa instead. It is a basic document required to support an application for an exchange visitor visa.
I-20
Essentially just a record that proves you are eligible for an exchange visa. Once accepted into exchange, you will receive this form from your college (it can sometimes take a while, so be patient!). This form is only relevant for those being issued a F-1 Visa.
I-901
This is the electronically generated copy of the SEVIS fee receipt. You will need this to show proof of your SEVIS payment.
I-94
Arrival/Departure Record is an important form for any foreign national who is in the USA on a temporary visa. This will be given to you by the US border security on arrival.
SEVIS
This stands for 'Student and Exchange Visitor Information System'. It is a system the USA Government uses to track and monitor nonimmigrant students and exchange visitors. You will need to pay a SEVIS fee as part of being in the system.
J-1
Type of student exchange visa.
F-1
Type of student exchange visa.
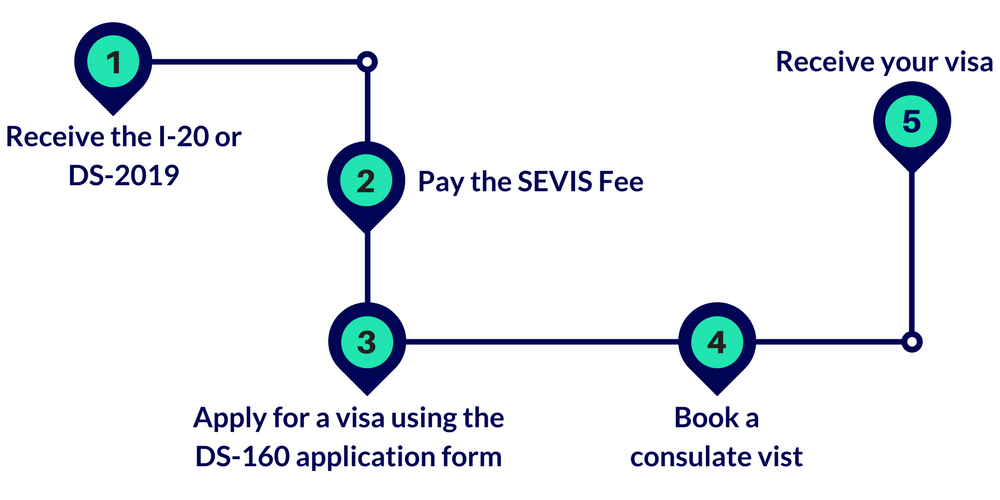
 Receive the I-20 or DS-2019
- Let's be clear, the I-20 and DS-2019 are essentially the same thing. It just depends on if your college is issuing you a J-1 (DS-2019) or F-1 visa (I-20)
- Your American college will send you this form
- Only once you receive this form will you be able to start the application process
- Sign this form
- Take note of the dates the form has specified for your exchange period. This is important when determining when the 30 day rule applies
- Keep this form with you as you will need it when entering in the USA – guard it like your passport!
 Pay the SEVIS fee (I-901)
- Go to the US Immigrations and Custom Enforcement Website to pay the SEVIS fee
- You can only do this after you have completed Step 1 as your I-20/DS-2019 will contain your SEVIS ID number which you will need to pay the fee
- It is extremely important to keep the receipt of your I-901 SEVIS Fee payment. You must present this as proof of your payment at your visa interview for Step 4
 Apply for a visa (DS-160 form)
- Try and do this soon after completing Step 2
- In order to get a student visa you will need to fill out the DS-160 Non Immigration Application before booking your consulate visit (Step 5)
- Go to the US Department of Sate Consular Electronic Application Centre website to begin the application process
 Book a Consulate Visit
- As soon as you have paid the SEVIS fee and done the DS-160 application, book your consulate visit at the American embassy ASAP – try find the earliest possible booking. Note: you can always reschedule your appointment if an earlier time slot opens up
- To find a booking time, go to the US Travel Docs website
- There are 7 items to bring to the consulate:
- Passport – a valid passport with at least 6 months validity beyond the intended period of stay in the US. For example, if you plan to return home from the USA on the 1st of January, make sure your passport expiry date is at-least the 1st of July (6 months later)
- 1xUS passport photo – This is not an ordinary passport photo. You need to go to the post office/photo shop and ask them specifically for US passport sized photos. Try get this done well before your consulate visit, otherwise there is usually a photoshop or post office located near the embassy. Visit US Travel Docs for more info on specific requirements. Key requirements include:
- Sizing: must be 2"x2" (5cmx5cm)
- Background: must be white
- Validity: photo must be taken within the last 6 months
- Eyewear: No Eye Glasses
- DS-160 confirmation page
- SEVIS I-901 Receipt
- Consulate appointment confirmation letter
- DS-2019 or I-20
- Cash or credit card – so you can purchase the visa at the consulate
- Tips for the consulate visit:
- Arrive 15 minutes before your appointment
- You need to go through security (similar to an airport)
- Just obey the rules, stay calm throughout the process and don't stress out too much
- You cannot take your phone so just cop the 1.5 hours without a device and maybe talk to people in the line!
- You will be asked some basic questions by the consulate officer
- You will also be fingerprinted (ink-free) when you arrive for your interview at the Consulate
- When the visa is approved, you will pay a visa issuance fee (~$100USD) at the Consulate
- You have to leave your passport with the consulate officer, as they will process the visa and put it on one of your passport pages. They will send your passport back to you via mail, usually within a week or two
- If you have left it too late (silly you), you can pay extra and tell the embassy you need the passport within 2 days via express post
 Receive your exchange visa
- As mentioned above, your passport and exchange visa will arrive to you by mail (a week or 2 after the consulate visit)
- Feel free to do a dance of celebration knowing that you have gotten yourself through this gruelling process
You need to present all your visa documents on arrival into the USA when going through customs/passport control. Keep all your visa related documents in a safe place in your carry on luggage. You never know what the USA customs officer may need from you, so better to be over-prepared with plenty of paperwork and evidence than have none at all!
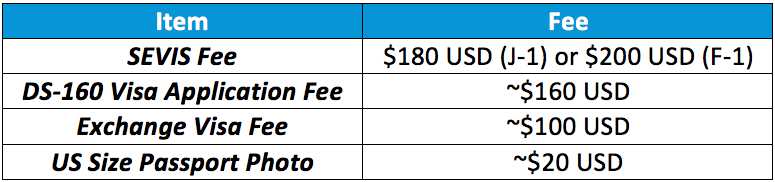
Unfortunately there are a bunch of random fees which are unavoidable throughout the visa process. Overall, all visa associated costs will sum up to around $500 USD (subject to change) comprising of: